


Three main methods of using MailChimp templates in Gmail, explained.
Gmail’s basic functionality is pretty impressive for a free email client. It offers a variety of different features to brighten up your emails. However, if you want to produce truly unforgettable emails to impact and boost ROI, you should consider doubling your email marketing efforts. A great way to do that is to use email templates, spicing up your email design.
What is the best email template builder on the market? Easy, Mailchimp! We’ve already told you all about how to build remarkable email templates in Mailchimp. Now, it’s time to talk about what to do next.
Part 1. Mailchimp: The whats, whys and hows
It doesn’t matter whether you’re an email marketing pro with years of experience behind you, or a beginner in the field; you must have already heard of the industry giant, Mailchimp. It’s one of the most popular email marketing softwares, used across companies of all natures and calibres. It’s packed with a heap of different email marketing tools to help you succeed in your email marketing campaigns. With Mailchimp, you can simplify even the most complex email marketing processes.
Essentially, the purpose of this software boils down to hustle-free mailing list and newsletter creation and management; email campaigns automation aimed at helping you collect more leads. Such a simple purpose is met through a load of different features...
- Drip campaign management features.
- Inbox preview and testing.
- Email marketing campaigns geo targeting tool.
- Email beamer.
- RSS to email converter.
- Email analytics tool.
- Template builder.
For a lot of Mailchimp users, it’s the template builder that makes Mailchimp so appealing. Indeed, the built-in Mailchimp template builder has plenty of benefits, to name a few…
- It has an intuitive interface, which makes it easy to use.
- It offers a lot of themes and featured templates to get you started.
- It has drag-and-drop functionality.
- It’s customisable.
The best part about Mailchimp template builder is that once your template is created, you can export it to use elsewhere. That way, you don’t have to sacrifice using an email client you’re familiar with just to take advantage of the beautiful Mailchimp email templates.
You can export any template from your Saved Templates folder in Mailchimp in a few simple steps.
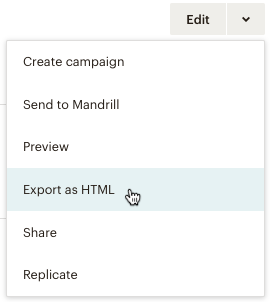
- Click the Campaigns icon and select Email templates from the drop-down menu.
- Find the template you’re looking to export.
- Click on the small arrow next to the Edit button and choose Export as HTML from the drop-down menu options.
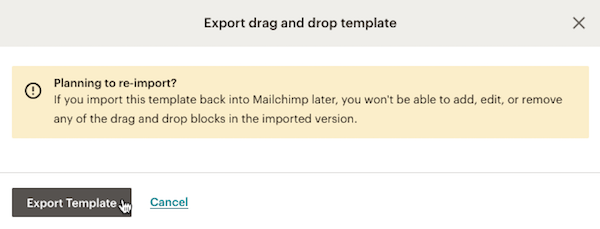
Note. If you’re trying to export a saved drag-and-drop template and not a template that was saved from an imported HTML file, you’ll get a Mailchimp service warning. Once you export a drag-and-drop template, it will no longer include drag-and-drop functionality when imported back into a Mailchimp account. If you want the functionality to remain, you should Share your saved templates instead.
To continue, click the Export Template button.
Just bear in mind that the emails you export from Mailchimp are going to be HTML emails, not plain text. It’s important to understand the difference between the two as the type of email affects delivery and therefore, the engagement of your campaign.
- An HTML email is an email that uses HyperText Markup Language. That means it’s built like a website. You can code emails to contain graphics, colours, links, and table columns. It allows you to format the text of your email more effectively and add various advanced images to your copy.
- A plain-text email is an email that contains just text with basic formatting. The outlay and the appearance of these emails are limited by the fact that the text in the email body can only include ASCII characters.
Naturally, your first instinct as a marketer is to use an HTML email to make your emails more visually appealing (colour choices can have an immense impact on the success of your email marketing campaign!). Still, you need to remember that there are some complications associated with the use of HTML emails.
While both formats allow receiving and viewing of emails, an HTML campaign may or may not be able to be displayed. It depends on the email client and the particular settings your recipients use. If the system recognises HTML, the recipient will see all the contents you include into your email. If it doesn’t, it’s important you include a plain-text version somewhere in your email too.
The best way to ensure your emails are displayed correctly is to use the email client you subscribers use. To do that you should opt for a popular email service, such as Gmail.
Mailchimp is a very friendly chimp. It works with various popular mailing services and CRM systems to ensure you get the most use out of the campaigns you launch and the data you subsequently collect. Of course, Gmail is among the services that can be used with Mailchimp.
Part 2. Gmail: The whats, whys and hows
Gmail is the most popular web-based email client delivered to us by Google.
Ever since its launch back in 2004, it’s been superior to all its competitors. From day one, Gmail has been offering its users 1GB of free storage, conversation-based grouping of messages, and enhanced search features. Going beyond that, the past 16 years have seen the functionality of Gmail constantly expanding and evolving, inevitably leading to market domination.
There are over 1.5 billion active Gmail users around the world.
Gmail is incredibly popular among both personal and business users because...
- It’s reliable. Google’s technology offers 99.978% availability and no scheduled downtime.
- It’s affordable. The basic version is free, and the premium plans prices start from as little as $5 per month.
- It’s safe. Gmail encrypts your emails in transit wherever possible.
- It’s convenient. Gmail allows you to filter and label all the conversations you have, so you can organise them more efficiently.
- It’s customisable. You can set up and maintain multiple inboxes.
- It’s scalable. You can send out mass emails to a large number of recipients in a couple of clicks.
- It’s creative. You can set up easily accessible email templates.
- It’s integrative. Gmail can be used in alignment with a lot of different third-party productivity tools, apps and extensions.
- It’s tracked. Once your email’s sent out, you can track its performance.
The last four factors make Gmail particularly perfect for launching email campaigns!
You can create your custom email templates from within Gmail. To do that, you need to first enable templates in your Gmail advanced settings.
Settings > See all settings > Advanced > Templates > Enable > Save Changes
Once you’ve enabled template use, you can craft one:
- Go to Gmail and start composing your email template in the Compose window.
- Click More, then choose Templates from the drop-down menu. To create a new template, click Save draft as template, and then Save as new template.
- To change a previously saved template, click Save draft as template. Under Overwrite Template, choose a template and click Save to overwrite it.
? NetHunt Pro Tip: Gmail lets you save up to 50 email templates!
Once you have some templates saved in your collection, you can start using them.
- When composing a new email, click More, and then Template.
- Under Insert template, choose a saved template for your email.
- Continue composing your email, and/ or click Send.
Gmail also allows you to use HTML templates instead of plain-text templates.Unfortunately, Gmail doesn’t let you edit the HTML ‘behind’ the message. You need to find workarounds for this limitation. There are three ways of doing this.
Method #1 - Ctrl C + Ctrl V
This one is fairly simple. All you need to do is to write your HTML code elsewhere and it’s written, you copy and paste it.
The whole process can be broken down into four steps:
- You create your page in HTML.
- You load the HTML code you created into a browser.
- You copy the contents of the browser.
- You paste the contents of the browser into Gmail’s Compose window.
While it doesn’t look too complicated, there are a couple of nuances you must remember.
- External Style Sheets are not supported. However, you can use inline CSS and embedded CSS in the head.
- Gmail doesn’t support web fonts.
- All the images you include in your HTML code must be hosted somewhere and not uploaded directly from your device.
- It’s best to organise the contents of your HTML template using pre-made templates.
Method #2 - Chrome’s developer tools
This is the method for those who use Gmail and Chrome in combination. It boils down to replacing the original code with a custom template, and can be explained in a couple of steps.
- Start composing your email, and then right-click anywhere within the Compose window.
- Select Inspect from the drop-down menu that appears.
- In the code panel that appears upon the click, find the “div” marked “contenteditable=true”, and then right-click and choose Edit as HTML.
- Replace the part inside the “div” tag with your custom HTML.
- Once you’re done replacing the code, your Compose window will show a rendered version of the HTML.
Method #3 - Chrome extensions
Last but not least, you can use some extra help. It’s a bit like the second method, where you’re editing the HTML code ‘behind the scenes’. With a Chrome extension, you’ll be able to replace the original HTML with your custom HTML. The only difference is that method #2 involves some harsh hacking of the OG code, while dedicated extensions make the process significantly easier.
Some of the most popular extensions for creating and using HTML templates in Gmail are:
- Gmass. A free extension to view and set HTML in the Compose window.
- NetHunt. Allows users to store a large number of templates in the form of an HTML code, and then pull them into emails from within the Compose window on request.
- Free HTML Editor for Gmail by cloudHQ. Requires Sign-In privileges and account registration. Includes WYSIWIG design tools.
- HTML Inserter for Gmail. Doesn’t require any OAuth access to the Gmail account, and client-side without sending any information back to a server.
MailChimp & Google: An email marketing power couple
Mailchimp and Gmail are the Bonnie and Clyde of the world of email marketing!.By leveraging the power of both, you can easily create a top-notch email marketing campaign that’ll wow your mailing list subscribers. All that in just… two steps?! Technically yes.
- Export your Mailchimp template from Mailchimp (refer to pt. 1 of this article)
- Import the HTML code into Gmail (refer to pt. 2 of this article)
Done! You’re awesome.
If you want even more, you should link Mailchimp and Gmail with a handy intermediary service such as CloudHQ. This allows you to import Mailchimp templates from Mailchimp directly, and into Gmail automatically.
Next steps: Putting templates to good use
Once you’re done with adding all your beautiful Mailchimp templates to Gmail, tweaking the letters when needed, it’s time to move onto the next step. It’s finally time to send out the email marketing campaign. There are different ways of sending and tracking bulk emails campaigns in Gmail.
Directly from Gmail
We’ve already covered the topic of sending mass emails in Gmail, but let’s go over the basics one more time.
If you choose to send your bulk email campaigns directly from Gmail, the whole process can be divided into several steps.
- Add campaign recipients to Contacts.
- Label those contacts in Contacts to segment them.
- Start composing an email.
- Choose the recipients of your campaign by typing the name of the Label you want to email.
- Choose the template you want to use in your email campaign.
- Hit Send.
Once the campaign has launched and your emails are out there, you can start tracking them. While you can collect data using the in-built Gmail email tracking tool, there’s only so much you can do with it. Only some accounts can request your recipient to send you a “read receipt”, which notifies you when they open your email. That’s some accounts, not all accounts.
This is far from efficient and hardly gives you valuable insight into email campaign performance. Instead, you should send and track email campaigns using dedicated software that helps you to automate the process!
Third-party email tracking tools
There are plenty of tools that can make your life easier and your bulk emailing more efficient. One of them is… you guessed it: NetHunt CRM for Gmail!
Being a fully-integrated Gmail CRM system, NetHunt allows you to both create, manage, send, and track email campaigns. Everything in one place and in just a couple of clicks.
- Create a new email campaign by clicking the appropriate button “New” on the dashboard. From there, you can pull the recipients from the folder and view them.
- The system will check for any duplicates so you don’t include any of them in your campaign.
- Preview and test your email to see exactly how it looks to recipients.
- Once everything is set up and ready to go, click the send button. You can use Gmail, NetHunt SMTP, or connect your own custom SMTP as delivery options.
- NetHunt lets you know how well your emails perform. There’s a dedicated email campaign stats tab, where you can see all the relevant metrics such as open rates, open times, and devices.
NetHunt is all you need to ensure your email campaign is well-organised; all for $24 per user per month after a 14-day free trial period. If that doesn’t float your boat, you can always try another email tracking software.
- GMass. This Gmail Chrome extension allows you to use Gmail to send mail merge campaigns with automatic follow-up emails. You can dynamically create mailing lists by adding people from search. On top of that, GMass can be merged with Google Sheets for better analytics. Prices start at $8.95 per month.
- MDirector. This email marketing platform allows you to schedule mass emails and enjoy the benefits of real-time data reporting on your campaigns. It supports over 600,000,000 emails sent per month. It also has its own gallery of thematic templates for your campaigns. However, MDirector is on the pricier side of the line. It costs €349 per year, paid annually.
The Chimp is a champ, not a chump. When combined with Gmail you can expect your ROI to skyrocket!

 product experts — let's find the best setup for your team